Ultima IX Ascension: Labirynt Deceit
Aktualizacja:

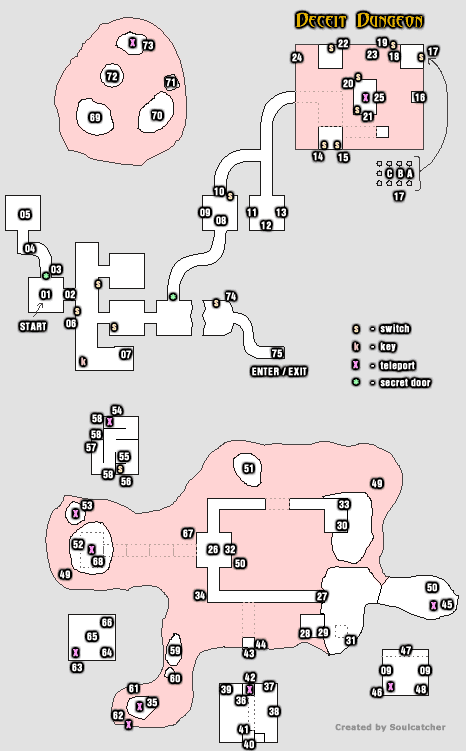
W labiryncie tym pojawiamy się po zasadzce jaką zastawił na nas Blackthorn w domu Samhayne po wizycie w New Magincia. Pierwsza część labiryntu to więzienie Blackthorna i tu mamy za zadanie wydostać się do dalszej części labiryntu. Dalsza część to seria zagadek prowadzaca nas do Glyph of Honesty. Aby go zdobyć musimy zebrać w labiryncie cztery Globes i umieścić je w dowolnej kolejności na czterech Pedestals co spowoduje iż pojawi się nam pomost to teleportu do końcowej części labiryntu.
01 - Start
02 - Porticulus - krata
03 - Secret Doors - aby się pojawiły trzeba poczekać aż zgaśnie pochodnia na korytarzu
04 - Ilusionary wall
05 - Phase Spider Statue - używając tej statuły przenosimy się pomiędzy różnymi wymiarami, w praktyce sprowadza się to do tego iż w jednym wymiarze możemy przechodzić przez drzwi a w innym przez kraty i w taki sposób możemy za pomocą przycisków znajdujących się w dalszej części labiryntu utorować sobie drogę dalej w realnym wymiarze.
06 - Switch to open (2)
07 - Bag
08 - Brazier - ignite it
09 - Monster "Mimic Chest"
10 - Door - will open when light in the room is green
11 - Button - Skeleton warrior
12 - Button - Green potion
13 - Button - activate force field over the lava
In this Lava Room follow that directions (tk - means take moving cart) : 15, tk, 17, 19, 20, 21, tk, 14, tk, fire at 23(using 22), fire at 24 (using 22), tk, 15, tk, 19, tk, 20, 25
14 - Switch - moving cart
15 - Switch - make bridge
16 - Statue throwing fireballs - face statue all the time to avoid hitting
17 - Buttons press ABC (see map)
18 - Stairs will appear
19 - Violet button
20 - Green Button
21 - Violet Button
22 - Five buttons to control statue
23 - Faceplate target
24 - Faceplate target
25 - Teleporter to (26)
26 - You will appear here
27 - Mirrage of the Glyph, Button
28 - Crystall Ball
29 - Buttons - use buttons to place (30) in line of (29) fire
30 - Shooting statue
31 - Transparent Block with shooting target
32 - Pedestal
33 - Statues Shooting fireballs at you
34 - Cart to (35)
35 - Teleporter to (36)
36 - Teleporter
37 - Healing Mirror
38 - Bow
39 - Clik statue to get arrows
40 - Shooting Target
41 - Press plate to see shooting target (42)
42 - Shooting target
Take teleport back and cart back
43 - Shooting target
44 - Valve - use it to lower lava level
45 - Teleport to (46)
46- Teleport to (45)
47 - Stand here and shot at the targets
48 - Globe
49 - Globe, Headstone - use it to remove lava for a moment
50 - Globe
51 - Pedestal
52 - Pedestal
53 - Teleporter to (54)
54 - Teleporter to (53)
55 - Warhammer
56 - Button
57 - Chest - Spell Full Health
58 - Shooting targets - move fast and shot three times when you press (56)
59 - Pedestal
60 - Headstone
61 - Chain Gauntlets
62 - Teleporter to 63
63 - Teleporter to 62
64 - Chest
65 - Button - press button and shot fast at the targets on the walls
66 - Globe - will appears
67 - Cart up
68 - Teleporter to 69
69 - You are here
70 - "Evill" Sorceress - don't kill her, she is Mariah - old Avatar friend, kill two illusions with shields and run away to cart
71 - Cart to Glyph
72 - Glyph of Honesty
73 - Teleporter to Exit
74 - Switch to turn off illusionary wall
75 - Exit
Wyjście z labiryntu prowadzi na wyspę Moonglow. Zaraz po wyjściu z labiryntu napotkamy agresywnego rycerza, nie zabijajcie go tylko spróbujcie dogadać się z nim.
- Ultima IX: Ascension - poradnik do gry
- Ultima IX Ascension: Ultima IX Ascension - poradnik do gry
- Ultima IX Ascension: Labirynty
- Ultima IX Ascension: Dungeon Despise
- Ultima IX Ascension: Labirynt Hythloth
- Ultima IX Ascension: Labirynt Deceit
- Ultima IX Ascension: Labirynt Covetous
- Ultima IX Ascension: Labirynt Wrong
- Ultima IX Ascension: Labirynt Shame
- Ultima IX Ascension: Labirynt Destard
- Ultima IX Ascension: Labirynt Abyss
- Ultima IX Ascension: Labirynt Guardian's
- Ultima IX Ascension: Labirynty
- Ultima IX Ascension: Ultima IX Ascension - poradnik do gry
Komentarze czytelników
Zabrania się kopiowanie jakichkolwiek obrazków, tekstów lub informacji zawartych na tej stronie. Strona nie jest powiązana i/lub wspierana przez twórców ani wydawców. Wszystkie loga i obrazki są objęte prawami autorskimi należącymi do ich twórców.
Copyright © 2000 - 2026 Webedia Polska SA wszelkie prawa zastrzeżone.
